|
How to use
the drawing program PAINT
Program
Paint is a program for drawing and writing and where we can easily paint
and process the image that can be later used or better inserted into
other Windows programs.
1.
Start the program Paint /Start/Programs/Accessories
2.
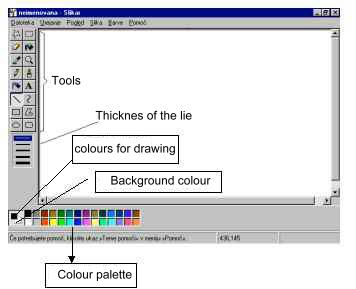
About the Window Paint and its organization
3.
Steps for creating an image
-
choose
the background colour (white, red…)
-
choose
the colour of the line
-
choose
the thickness of the line
-
choose
the tool for drawing (pencil, brush…)
-
draw
-
correct
-
save
the image
1.
1. How we draw the free line
-
Choose
the tool for free line drawing (the pencil or the brush)
-
Put
the cursor on the working space
-
Press
the left button of the mouse, keep it pressed and move it to shape
the figure
3.
2. How to choose the colour of the line
Click
(with the left button of the mouse) the wanted colour in colour palette
at the bottom of the window. (The upper left square at the beginning of
the palette changes into the chosen colour.) and then click into the
working space.
3.3.
How to choose the colour of the background
Click
(with the right button of the mouse) the colour in colour palette at the
bottom of the window. (The square below at the beginning of the palette
changes into the chosen colour.)
3.
4. Choose the thickness of the line
Click
on the line and then the special palette with the dots will appear below
the tools. Choose one you want by clicking it.
3.
5. Drawing tools (to the left)
 1. Tools for
cutting
1. Tools for
cutting
With
this tool we cut irregular or regular shapes from the picture. The
part we have cut we can move to different locations, erase it or copy it
into Clipboard and paste it later into other programs.
 Eraser Eraser
Parts
of the picture can be erased with the eraser. We can make it bigger by clicking
on + or smaller by clicking -. But be careful there should be white background
chosen (The square below at the beginning of the palette should be white.) in
the palette when you want to erase the parts.
 3.
Filling in the colours 3.
Filling in the colours
Click
the bucket in the tool palette and then the wanted colour in the colour
palette. With this tool a closed part of the picture can be filled in
with one click with the chosen colour (But remember! The lines should
make a circle or other shape and the beginning of the line should touch
the end of it).
 4. Dripping tube
This
tool chooses the colour from the picture and not from the colour palette. You
click with the left button of the mouse on certain colour in the picture and you
can use that same colour to draw some other parts.
 5. magnifying glass 5. magnifying glass
Enlarge the view of the picture to see it closer, to correct or fill in
tiny pieces of an object.

|
 Paint
Program
Paint
Program