Pollination of the Asclepiads (Asclepiadacea) |
|
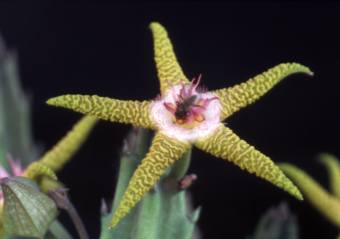
Pollinators of Stapelia schinzii are
usually flies |
|

Asclepiadaceae is a plant family which differs from others by having a very complex sexual apparatus and a complicated pollination procedure. A brush for transferring pollen to the stigma of the pistil is not sufficient for hand pollination. We need a more elaborate tool. If we want to understand the process of pollination, we must first get familiar with the structure of the asclepiad flower and with its sexual apparatus. The flower structure differs even between succulent and non-succulent members of the family.
|
|
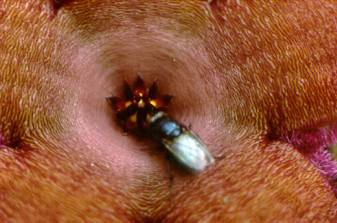
Fly in the flower of Stapelia schinzii
|
The flower structure
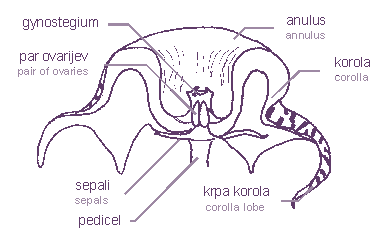
The pedicle ends with five sepals, which are usually very small. Corolla is joined together at the base of flower. Usually it is 5-lobed, sometimes we can find flowers with more or fewer lobes. Some genera (e.g. Orbea, Huernia, Orbeanthus and Duvalia) have flowers with a projecting central circle called an annulus . The sexual apparatus, the gynostegium (sexual column), is composed of staminal column and corona. A pair of ovaries is situated within the staminal column and corona. The points of the ovaries are joined together with a style head. The staminal column is a sexual organ which is a sexual organ the name of which has its origin in stamina.
 |
The flower structure of Huernia
zebrina drawing by: Iztok Mulej |
The corona consists of inner and outer lobes. The inner corona is usually inclined against the staminal column, whilst outer corona lobes lie flat in the base of corolla or they are shifted away from the column. They can be larger than the inner one or so reduced that they can’t even be found. The coronal structure is different in various genera and it is the predominating factor for plant classification. The shape of corona leads insects to nectar cavity so that pollination is most likely to happen.

Gynostegium of Huernia zebrina
topview (left); sideview (right)
drawing by: Iztok Mulej
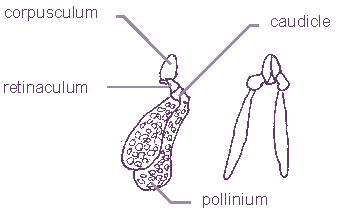
Unlike other plants, asclepiads do not have a stigma. It is simulated by the style head that covers the gynostegium. The real stigma is found between lobes of inner corona and it has a form of a slot. It is named the staminal lock or guide rail or anther wings. The nectar cavity is placed under the guide rails. Above them, there are anther forms named pollinaria. These are located in the corners of the style head, between the two inner corona lobes. Asclepiads don’t even have stamens as most flowers do. Pollen grains are contained in a waxy pollen mass or pollen sack called a pollinium. A pair of pollinia are joined together with a translator apparatus to form a pollinarium. The translator apparatus consists of style head secretions. It is composed of a cone-shaped form - corpusculum1 and of a pair of translator arms (caudicles) which carry pollinia. The milkweed (Asclepias syriaca, a non-succulent asclepiad) translator arm is composed of two parts. The retinaculum and the corpusculum are joined together and the translator (caudicle) is accreted with the pollinium. Retinacula of Stapeliae are transformed into caudicle wing. The translator may be attached to corpusculum directly or via the wings.
 |
Pollinarium of Huernia zebrina |
|
Polinarium of Asclepias syriaca |
 |
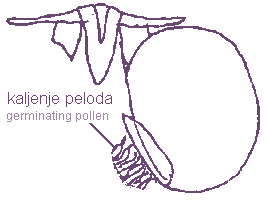
The pollen mass or pollinium is usually oval or “D” shaped. Pollen sacks of Stapeliae have a hook form named the pollinium key or wave crest or anchor margin. It must be inserted into the staminal lock during the process of pollination. If a pollinium is removed from the wave crest the day after insertion, pollen tubs can be found germinating from the pollinium key. The pollinium of milkweeds have no pollinium key and are inserted in the staminal lock, which is deep enough to receive the whole pollen mass.
|
|
Germinating of the pollens from pollinium key by Angolluma
eremastrum
|
Pollination in Nature
Insects carry out pollination of asclepiads in the nature. The only Asclepiad I found growing in my neighbourhood was Asclepias syriaca, which used to be in cultivation in the 19th century and later ran wild in my country. Pollinators of milkweeds2 are honeybees. Stapeliads attract other pollinators. Their flowers usually have a very unpleasant smell and attract flies and other insects which feed on excrement and carrion. The coloration of the flowers resembles rotting meat and this, together with the odour, hairs and cilia invites insects. The intensity of the smell varies with the time of day and with the weather. In hot sunny days it is very strong and pollinators can scent it from far and wide.
An insect is usually trapped by a leg or head hairs or bristles in the staminal lock while searching for food or for a place to lay eggs. When the insect tries to free itself, its trapped part slides up the only possible way, into the guide slot of the corpusculum and tears it away. If the pollinator is strong enough, it pulls out the entire pollinarium. Weak insects can remain trapped.
|
Fly caught in the flower of Stapelia
flavopurpurea |
 |
When visiting the next flower, the pollinium key may be caught in the guide of the staminal lock. During the struggle of the insect to free itself, the pollinium wedges into the staminal lock. The pollinarium breaks at the translator arm and the pollinator with the remaining translator and another pollinium leave the flower. The insect can pollinate another flower with the remaining pollinarium.
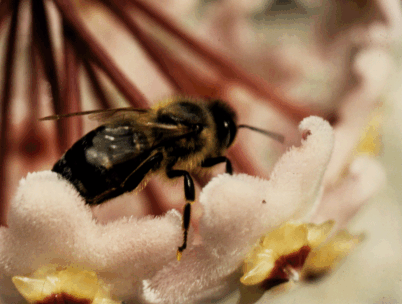 |
Pollinator (honey bee) of Hoya
carnosa with the pollinarium attached on the leg Photo: Iztok Mulej |
Pollen germinates from the pollinium key into the style head, after it has been placed in the staminal lock. A few days after successful pollination the corolla separates from the pedicle. Only two follicles are left which are covered with sepals. After successful pollination the pedicle elongates or fattens. Follicles develop into a paired fruit in the form of horns. They can develop soon after pollination, (a pollinated Hoodia juttae starts developing fruit in a week or two and some Huernia hybrids a month after pollination), mostly the following spring, in some cases even in a few years time. The time mechanism of fruit development is unknown. The pedicels of successfully pollinated flowers often dry out and fall away some months later. When the fruits are ripe, they rapture along one side. The seeds, fitted out with silky flying hairs, are in nature blown far and wide by the wind.
Hand pollination
Hand pollination isn’t complicated; we just need proper tools. It is necessary to use a magnifying lens for artificial pollination, because the reproductive organs of asclepiads are very small (a pollinium is seldom larger than 1 mm). I use a stereo Carl Zeiss microscope with a magnification of ×6 - ×100. Mostly I need magnifications ×10, ×16 and ×25; and occasionally ×40.
With magnifications greater than ×25 the depth of field decreases and a staminal lock can not be brought into focus.
To remove and place a pollinarium (pollinium) I use variously shaped wires from an electrical wire coil. To remove the pollinarium I use hooked wires (I have tried to use hooked spines of Mammillaria, but it was very difficult to glue them onto the wire) and L-shaped or straight wires for placing the pollinium into a staminal lock. Some plants (Echidnopsis) have tiny pollinaria and such tools are too large. Some wires are thinned with pliers.
The first step of pollination is placing a plant under the microscope. This procedure seems easy, but it is necessary to use the imagination. The focusing mechanism is not sufficiently adjustable to allow the bigger plants to be observed. I sometimes have to put a taller plant in my lap. Some stapeliads have a very short pedicle, so the plant has to be placed in a horizontal position. I hardly need mention that sand and compost usually starts scattering around. Other plants have brittle stems. Sometimes a broken stem with the pollinated flower would end up in my hand, if I was not careful enough.
The pollinarium is removed with a hooked wire. I push the corpusculum away from the style head and it separates from the gynostegium. I pull pollinarium with a hooked wire. A membrane protects the pollinia in some species and the procedure for removal is more complicated.
When I cross-pollinate more than a few plants, I put the already removed pollinaria on a piece of glass (I use it as a weight for grafted cacti seedlings) and label them. I do the same procedure with other plants. When I do self-pollination, I put the pollinarium somewhere in the flower.
For placing the pollinium, I use a straight or a slightly curved wire. The pollinium has to be turned with the pollinium key against the staminal lock. It is placed at the opening of the staminal lock and then it’s pulled with the hooked wire through the rails until it wedges in. Sometimes more pollinia are inserted, although only one is sufficient for successful pollination. It is good to pollinate all five locks or to protect the flower from natural pollinators, if we want to prevent unwanted surprises.
Some of the plants have deep corolla tubes (e.g. Tavaresia grandiflora, Huernia barbata, …). In that case, a part of corolla has to be cut off with a razor blade or scalpel. We mustn’t cut too much of the corolla away. The cut edges of the flower secrete a lot of liquid, which can be mopped up with a piece of paper handkerchief. Some flowers secrete so much nectar that it fills the staminal lock. Inserting of the pollinium is not an easy task, because nectar is very adhesive and viscose. I use a paper handkerchief in this case, too. I crumple a piece of it between my fingers and blot the nectar with a thin paper thread under the microscope.
After pollination, I label the flower with a plastic or paper protocol (both parents, number of inserted pollinia and date of pollination).
We should be patient while we wait for results of pollination. Follicles may develop soon, but most likely the following spring or even later.
In the past three years (this article was written in 1997) I have made about 100 pollinations in the genera Stapelia, Huernia, Duvalia, Larryleachia (Trichocaulon), Hoodia, Echidnopsis, Tridentea, Angolluma, Stapelianthus and Piaranthus, mostly last year. The first year was the time of my apprenticeship and I did not write down the data about pollination. Most were self-pollinations and a lot of them unsuccessful (I didn’t have plants of different clones). I began with the pollination of the large flowers of Stapelia gigantea (now I think that the easiest to pollinate are flowers of Huernia and Duvalia). I was faster than the flies and I inserted only one pollinium. Later I protected the flower with a mesh. The species is self-fertile so the pollination was successful. After a clumsy beginning I am into a routine now. Placement of a pollinium into a staminal lock takes only a minute.
I have tried with hybridisation, too. I have mostly worked with the genera Huernia and Duvalia, which are closely related. I have made some intergeneric hybrids. The seeds germinated and plants are growing. I am waiting for the first flowers.
Once I considered my best success was the pollination of a Larryleachia (Trichocaulon, Lavrania) picta. I got three pairs of follicles full of seeds. The flowers of Larryleachia are very small (they are about 6-7 mm in diameter). A year later I pollinated an Echidnopsis cereiformis. I used yellow and brown flowered plants. Flowers are really small and the pollinium is just some tenths of a millimetre in size. Pollination took a lot of time. I had to thin the wires for removing and placing pollinia, because the usual tool was too thick. Placement of pollinia was successful in both plants. One of the follicles dried and fell away, the other has been holding on for the last 6 months.
I hope that the procedure of pollination and the flower structure as presented in the text and figures are clear enough. My stimulus to try pollination was the article “Pollination of the stapeliads” by Dr G. Barad published in the Cactus & Succulent Journal (U.S.). I recommend this article to everybody, who wants to start pollination of the asclepiads. You just need the equipment and plants in bloom. It is necessary to dissect some flowers under the microscope to study the structure of sexual apparatus first.
I have managed to videotape the process of pollination. I used a video camera adapted for use with a microscope. I used a Duvalia flower, because the staminal lock is easily accessible. The pollination was not so easy. I had to observe the process of pollination on a TV monitor without any depth of field or stereo vision. The videotape was successfully recorded, edited, and shown in September 1997 at the monthly meeting of the Cactus & Succulent Society of Slovenia.
Acknowledgements
I am most grateful to my headmaster Prof. Jože Pogačar and to my co-worker Prof. Marta Mencinger who allowed me to use the school equipment. In addition, I feel indebted to Dr Gerald Barad, although I don’t know him personally, for the encouragement of his article.